Organizing modules in a project
Before we move on to any coding in the recipe, let’s look at the overall structure of a F# project. In particular: (a) what code should be in which modules and (b) how the modules should be organized within a project.
A newcomer to F# might be tempted to organize code in classes just like in C#. One class per file, in alphabetical order. After all, F# supports the same object-oriented features that C# does, right? So surely the F# code can be organized the same way as C# code?
After a while, this is often followed by the discovery that F# requires files (and code within a file) to be in dependency order. That is, you cannot use forward references to code that hasn’t been seen by the compiler yet**.
This is followed by general annoyance and swearing. How can F# be so stupid? Surely it impossible to write any kind of large project!
In this post, we’ll look at one simple way to organize your code so that this doesn’t happen.
and keyword can be used in some cases to allow mutual recursion, but is discouraged.
A standard way of thinking about code is to group it into layers: a domain layer, a presentation layer, and so on, like this:
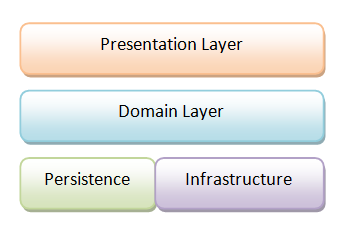
Each layer contains only the code that is relevant to that layer.
But in practice, it is not that simple, as there are dependencies between each layer. The domain layer depends on the infrastructure, and the presentation layer depends on the domain.
And most importantly, the domain layer should not depend on the persistence layer. That is, it should be “persistence agnostic”.
We therefore need to tweak the layer diagram to look more like this (where each arrow represents a dependency):
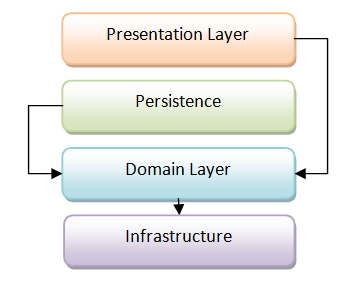
And ideally this reorganization would be made even more fine grained, with a separate “Service Layer”, containing application services, domain services, etc. And when we are finished, the core domain classes are “pure” and have no dependencies on anything else outside the domain. This is often called a “hexagonal architecture” or “onion architecture”. But this post is not about the subtleties of OO design, so for now, let’s just work with the simpler model.
“It is better to have 100 functions operate on one data structure than 10 functions on 10 data structures” – Alan Perlis
In a functional design, it is very important to separate behavior from data. The data types are simple and “dumb”. And then separately, you have a number of functions that act on those data types.
This is the exact opposite of an object-oriented design, where behavior and data are meant to be combined. After all, that’s exactly what a class is. In a truly object-oriented design in fact, you should have nothing but behavior – the data is private and can only be accessed via methods.
In fact, in OOD, not having enough behavior around a data type is considered a Bad Thing, and even has a name: the “anemic domain model”.
In functional design though, having “dumb data” with transparency is preferred. It is normally fine for the data to be exposed without being encapsulated. The data is immutable, so it can’t get “damaged” by a misbehaving function. And it turns out that the focus on transparent data allows for more code that is more flexible and generic.
If you haven’t seen it, I highly recommend Rich Hickey’s excellent talk on “The Value of Values”, which explains the benefits of this approach.
So how does this apply to our layered design from above?
First, we must separate each layer into two distinct parts:
- Data Types. Data structures that are used by that layer.
- Logic. Functions that are implemented in that layer.
Once we have separated these two elements, our diagram will look like this:
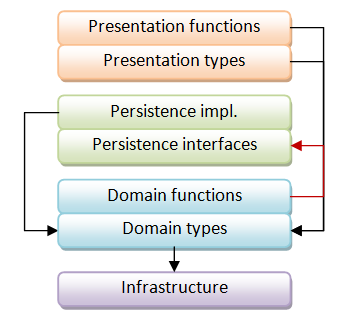
Notice though, that we might have some backwards references (shown by the red arrow). For example, a function in the domain layer might depend on a persistence-related type, such as IRepository.
In an OO design, we would add more layers (e.g. application services) to handle this. But in a functional design, we don’t need to – we can just move the persistence-related types to a different place in the hierarchy, underneath the domain functions, like this:
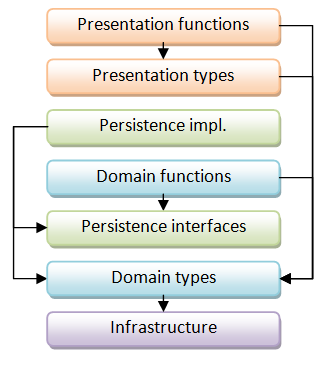
In this design, we have now eliminated all cyclic references between layers. All the arrows point down.
And this without having to create any extra layers or overhead.
Finally, we can translate this layered design into F# files by turning it upside down.
- The first file in the project should contain code which has no dependencies. This represents the functionality at the bottom of the layer diagram. It is generally a set of types, such the infrastructure or domain types.
- The next file depends only on the first file. It would represents the functionality at the next-to-bottom layer.
- And so on. Each file depends only on the previous ones.
So, if we refer back to the use case example discussed in Part 1:
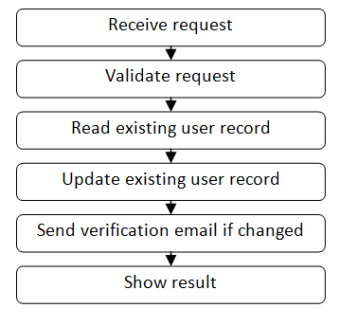
then the corresponding code in an F# project might look something like this:
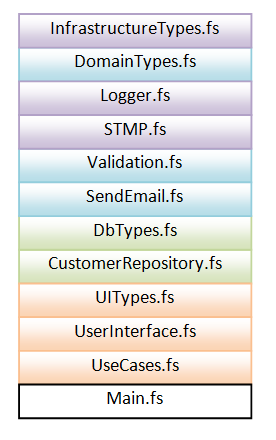
At the very bottom of the list is the main file, called “main” or “program”, which contains the entry point for the program.
And just above it is the code for the use cases in the application. The code in this file is where all the functions from all the other modules are “glued together” into a single function that represents a particular use case or service request. (The nearest equivalent of this in an OO design are the “application services”, which serve roughly the same purpose.)
And then just above that is the “UI layer” and then the “DB layer” and so on, until you get to the top.
What’s nice about this approach is that, if you are a newcomer to a code base, you always know where to start. The first few files will always be the “bottom layer” of an application and the last few files will always be the “top layer”.
A common question from newcomers to F# is “how should I organize my code if I don’t use classes?”
The answer is: modules. As you know, in an object oriented program, a data structure and the functions that act on it would be combined in a class. However in functional-style F#, a data structure and the functions that act on it are contained in modules instead.
There are three common patterns for mixing types and functions together:
- having the type declared in the same module as the functions.
- having the type declared separately from the functions but in the same file.
- having the type declared separately from the functions and in a different file, typically containing type definitions only.
In the first approach, types are defined inside the module along with their related functions. If there is only one primary type, it is often given a simple name such as “T” or the name of the module.
Here’s an example:
namespace Example

// declare a module
module Person =

    type T = {First:string; Last:string}

    // constructor
    let create first last =
        {First=first; Last=last}

    // method that works on the type
    let fullName {First=first; Last=last} =
        first + " " + last
So the functions are accessed with names like Person.create and Person.fullName while the type itself is accessed with the name Person.T.
In the second approach, types are declared in the same file, but outside any module:
namespace Example

// declare the type outside the module
type PersonType = {First:string; Last:string}

// declare a module for functions that work on the type
module Person =

    // constructor
    let create first last =
        {First=first; Last=last}

    // method that works on the type
    let fullName {First=first; Last=last} =
        first + " " + last
In this case, the functions are accessed with the same names (Person.create and Person.fullName) while the type itself is accessed with the name such as PersonType.
And finally, here’s the third approach. The type is declared in a special “types-only” module (typically in a different file):
// =========================
// File: DomainTypes.fs
// =========================
namespace Example

// "types-only" module
[<AutoOpen>]
module DomainTypes =

    type Person = {First:string; Last:string}

    type OtherDomainType = ...

    type ThirdDomainType = ...
In this particular case, the AutoOpen attribute has been used to make the types in this module automatically visible to all the other modules in the project – making them “global”.
And then a different module contains all the functions that work on, say, the Person type.
// =========================
// File: Person.fs
// =========================
namespace Example

// declare a module for functions that work on the type
module Person =

    // constructor
    let create first last =
        {First=first; Last=last}

    // method that works on the type
    let fullName {First=first; Last=last} =
        first + " " + last
Note that in this example, both the type and the module are called Person. This is not normally a problem in practice, as the compiler can normally figure out what you want.
So, if you write this:
let f (p:Person) = p.First
Then the compiler will understand that you are referring to the Person type.
On the other hand, if you write this:
let g () = Person.create "Alice" "Smith"
Then the compiler will understand that you are referring to the Person module.
For more on modules, see the post on organizing functions.
For our recipe we will use a mixture of approaches, with the following guidelines:
Module Guidelines
If a type is shared among multiple modules, then put it in a special types-only module.
- For example, if a type is used globally (or to be precise, within a “bounded domain” in DDD-speak), I would put it in a module called
DomainTypesorDomainModel, which comes early in the compilation order. - If a type is used only in a subsystem, such as a type shared by a number of UI modules, then I would put it in a module called
UITypes, which would come just before the other UI modules in the compilation order.
If a type is private to a module (or two) then put it in the same module as its related functions.
- For example, a type that was used only for validation would be put in the
Validationmodule. A type used only for database access would be put in theDatabasemodule, and so on.
Of course, there are many ways to organize types, but these guidelines act as a good default starting point.
F# tooling, such as that in Visual Studio, supports folders for when you have more complicated projects. However, they’re not the same kinds of folders that you would expect if you’re coming from C#.
Folders in F# tools must conform to file ordering semantics, just like files. For some projects, top-down ordering is not always as straightforward as the, “each file depends upon the one above it” idiom. There may actually be groups of files which reside in the same “level” of the dependency order, and these files may be related to overall functionality. This is where folders come in.
A concrete example of this is in the F# tools for Visual Studio itself. In this project, the top-down stack of dependencies is actually quite small, despite there being a moderate amount of files. The “Completion” folder contains multiple files which are about providing completion (IntelliSense) in Visual Studio. There are multiple kinds of completion in Visual Studio, and logic which can be shared across some of them - but that shared logic would not be applicable for anything else.
To learn more about ordering with F# and its effects on a codebase, see the post on cycles and modularity in the wild.
If you are coming from an OO design, you might run into mutual dependencies between types, such as this example, which won’t compile:
type Location = {name: string; workers: Employee list}

type Employee = {name: string; worksAt: Location}
How can you fix this to make the F# compiler happy?
It’s not that hard, but it does requires some more explanation, so I have devoted another whole post to dealing with cyclic dependencies.
Let’s revisit the code we have so far, but this time organized into modules.
Each module below would typically become a separate file.
Be aware that this is still a skeleton. Some of the modules are missing, and some of the modules are almost empty.
This kind of organization would be overkill for a small project, but there will be lots more code to come!
/// ===========================================
/// Common types and functions shared across multiple projects
/// ===========================================
module CommonLibrary =

    // the two-track type
    type Result<'TSuccess,'TFailure> =
        | Success of 'TSuccess
        | Failure of 'TFailure

    // convert a single value into a two-track result
    let succeed x =
        Success x

    // convert a single value into a two-track result
    let fail x =
        Failure x

    // apply either a success function or failure function
    let either successFunc failureFunc twoTrackInput =
        match twoTrackInput with
        | Success s -> successFunc s
        | Failure f -> failureFunc f


    // convert a switch function into a two-track function
    let bind f =
        either f fail

    // pipe a two-track value into a switch function
    let (>>=) x f =
        bind f x

    // compose two switches into another switch
    let (>=>) s1 s2 =
        s1 >> bind s2

    // convert a one-track function into a switch
    let switch f =
        f >> succeed

    // convert a one-track function into a two-track function
    let map f =
        either (f >> succeed) fail

    // convert a dead-end function into a one-track function
    let tee f x =
        f x; x

    // convert a one-track function into a switch with exception handling
    let tryCatch f exnHandler x =
        try
            f x |> succeed
        with
        | ex -> exnHandler ex |> fail

    // convert two one-track functions into a two-track function
    let doubleMap successFunc failureFunc =
        either (successFunc >> succeed) (failureFunc >> fail)

    // add two switches in parallel
    let plus addSuccess addFailure switch1 switch2 x =
        match (switch1 x),(switch2 x) with
        | Success s1,Success s2 -> Success (addSuccess s1 s2)
        | Failure f1,Success _  -> Failure f1
        | Success _ ,Failure f2 -> Failure f2
        | Failure f1,Failure f2 -> Failure (addFailure f1 f2)


/// ===========================================
/// Global types for this project
/// ===========================================
module DomainTypes =

    open CommonLibrary

    /// The DTO for the request
    type Request = {name:string; email:string}

    // Many more types coming soon!

/// ===========================================
/// Logging functions
/// ===========================================
module Logger =

    open CommonLibrary
    open DomainTypes

    let log twoTrackInput =
        let success x = printfn "DEBUG. Success so far: %A" x; x
        let failure x = printfn "ERROR. %A" x; x
        doubleMap success failure twoTrackInput

/// ===========================================
/// Validation functions
/// ===========================================
module Validation =

    open CommonLibrary
    open DomainTypes

    let validate1 input =
       if input.name = "" then Failure "Name must not be blank"
       else Success input

    let validate2 input =
       if input.name.Length > 50 then Failure "Name must not be longer than 50 chars"
       else Success input

    let validate3 input =
       if input.email = "" then Failure "Email must not be blank"
       else Success input

    // create a "plus" function for validation functions
    let (&&&) v1 v2 =
        let addSuccess r1 r2 = r1 // return first
        let addFailure s1 s2 = s1 + "; " + s2  // concat
        plus addSuccess addFailure v1 v2

    let combinedValidation =
        validate1
        &&& validate2
        &&& validate3

    let canonicalizeEmail input =
       { input with email = input.email.Trim().ToLower() }

/// ===========================================
/// Database functions
/// ===========================================
module CustomerRepository =

    open CommonLibrary
    open DomainTypes

    let updateDatabase input =
       ()   // dummy dead-end function for now

    // new function to handle exceptions
    let updateDatebaseStep =
        tryCatch (tee updateDatabase) (fun ex -> ex.Message)

/// ===========================================
/// All the use cases or services in one place
/// ===========================================
module UseCases =

    open CommonLibrary
    open DomainTypes

    let handleUpdateRequest =
        Validation.combinedValidation
        >> map Validation.canonicalizeEmail
        >> bind CustomerRepository.updateDatebaseStep
        >> Logger.log
In this post, we looked at organizing code into modules. In the next post in this series, we’ll finally start doing some real coding!
Meanwhile, you can read more on cyclic dependencies in the follow up posts:
- Cyclic dependencies are evil.
- Refactoring to remove cyclic dependencies.
- Cycles and modularity in the wild, which compares some real-world metrics for C# and F# projects.
 Twitter